Tutorial
How To Use Filezilla to Transfer and Manage Files Securely on your VPS

Introduction
Are you a recent cloud hosting convert and find yourself struggling to figure out how to best manage the files on your first virtual private server (VPS)? Do you find yourself intimidated by the command line? If so, you will be happy to learn that FileZilla provides a user-friendly graphical interface that can securely transfer files to-and-from, as well as move files around within, your VPS.
Secure Communication
The two most common methods of securely transmitting information between two computers are the (i) Secure Shell (SSH) and (ii) Transport Layer Security (TLS), and its predecessor Secure Sockets Layer (SSL), cryptographic protocols. Both are public-key cryptography tunneling protocols that aim to create a secure, confidential exchange of data and connection across a network (particularly the internet). The encryption technologies used by both protocols are very reliable, and are (when configured correctly) nearly impossible for hackers to break into. However, while both protocols provide similar services, they are not the same. In fact, they have several significant differences that are beyond the scope of this article.
Today, OpenSSH is a default software package found on Unix-like operating systems such as Mac OS X and Linux. Thus, programs or subsystems that are based on the SSH protocol will work “out-of-the-box” without having to go through the additional steps of either purchasing or creating the requisite SSL certificate needed for certain modes of secure data transmissions via TLS/SSL.
FTP vs. SCP vs. SFTP vs. FTPS
When needing to upload or download files from your VPS in real time, you essentially have the following options:
- File Transfer Protocol (FTP);
- Secure Copy Program (SCP);
- SSH File Transfer Protocol (SFTP); or
- FTP over TLS/SSL (FTPS).
FTP *not secure
Among the various file-transfer options, one should never, ever, ever connect to a remote server via FTP; SCP and SFTP are just as easy to use, but provide much more security. In addition, while FTP requires the installation of FTP server software such as vsFTP or ProFTP, both SCP and SFTP utilize the SSH protocol and, as a result, will work “out-of-the-box” when connecting to a remote Unix-like machine, such as Mac OS X or Linux.
SCP vs. SFTP
Given that both SCP and SFTP utilize the SSH protocol in connecting to another computer, the two methods are fairly equal in regard to security. SFTP has a slight edge in regard to efficiency, because an interrupted file-transfer can resume where it left off in the event of a broken connection that is later re-established.
SFTP vs. FTPS
SFTP should not be confused with FTPS, because the two methods are incompatible with each other. While FTPS can provide equal security, it does require additional steps to deploy if one does not already have an SSL certificate.
SFTP Clients
There are several quality SFTP clients out there: Cyberduck, Filezilla or WinSCP, to name a few. This article, however, will focus on Filezilla – an open-source (i.e. free) FTP client for Windows, Mac OS X and Linux. In addition to being able to download the program, the filezilla-project.org site also contains a documentation Wiki and a Support Forum.
Key-based Authentication
With SFTP, you have two user-authentication options when connecting to a cloud server: (i) passwords or (ii) SSH keys. For a discussion on the benefits of SSH keys over passwords and/or instructions on setting up password-less logins on your server, please refer to How To Create SSH Keys with PuTTY to Connect to a VPS.
SFTP via SSH2 Key-based Authentication
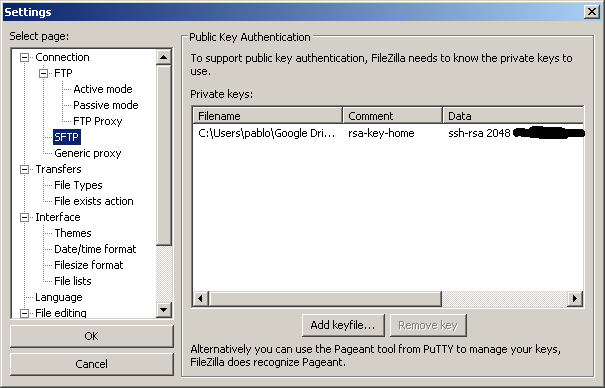
FileZilla has a built-in key management page in the Settings dialog, which allows you to save your Public (SSH) Key and to (securely) automate the process of connecting to a remote server.
Prequisite
If you have yet to create an SSH key pair, you can do so by following one of two DigitalOcean tutorials:
- Windows users: How To Create SSH Keys with PuTTY to Connect to a VPS
- Mac OSX & Linux users: How To Set Up SSH Keys
Follow these steps once you have an SSH key pair that you would like to use to connect to your VPS:
- Open the FileZilla client.
- From the top of the home screen, click on Edit and select Settings.
- On the left side of the menu, expand the Connection section and highlight SFTP.

- Click on the [Add keyfile…] button and browse your local machine’s directories and select your Private Key file.
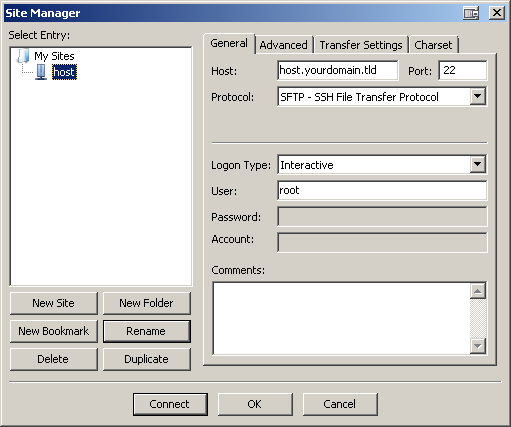
- Then, again from the top of FileZilla’s home screen, click on File and select Site Manager.
- Finally, on the left side of the Site Manager, click on the New Site button and type a unique name under My Sites that will allow you to easily identify this particular remote server in the future.

- Now, under the General tab, fill in the Host (with either an IP address or FQDN) and Port fields (default is 22).
- In the Protocol dropdown menu, select SFTP - SSH File Transfer Protocol.
- In the Logon Type dropdown menu, select Interactive.
Note for PuTTY users with passphrase-protected public keys: If your original .ppk file is password-protected, FileZilla will convert your .ppk file to an unprotected one when importing the key into FileZilla. As of version 3.0.10, a password-protected key file is not yet supported.
If a password-protected key file is desired, FileZilla is able to utilize PuTTY’s Pageant tool.
- Simply run Pageant; in your system tray, you will see the Pageant icon appear.
- Right-click on the icon and select Add Key and select your private key (.ppk) file.
- Then, follow the prompt to enter your passphrase.
- Finally, launch FileZilla and connect to your virtual private server via SFTP using SSH2 with a username and an empty password (do not forget to close pageant when you are done).
Editing Text Files
In managing your VPS, you will inevitably encounter a situation where some programming (text) files require edits. FileZilla does not carry a built-in text editor, which gives you the freedom of using any text editor of your choice. A popular editor among Windows users is Notepad++ because it is lightweight and can work with many of today’s popular programming languages.
By default, FileZilla is configured to utilize your local system’s default editor. If you do not wish to make Notepad++ your system’s default text editor, but would nevertheless like to use it to edit HTML, XML, Python, CSS, PHP & other programming files on your VPS:
- From the FileZilla home screen, click on Edit and select Settings.
- Along the left side of the Settings window, highlight File editing.
- Then, select the radio button associated with Use custom editor and click on the Browse button.
- Find your desired editor’s executable (.exe on Windows machines), double-click on it, and click the OK button to save your changes & close the Settings window.
<p><div class=“author”>Article submitted by: <a href=“https://plus.google.com/107285164064863645881?rel=author” target=“_blank”>Pablo Carranza</a> </div></p>
Thanks for learning with the DigitalOcean Community. Check out our offerings for compute, storage, networking, and managed databases.
This textbox defaults to using Markdown to format your answer.
You can type !ref in this text area to quickly search our full set of tutorials, documentation & marketplace offerings and insert the link!
This comment has been deleted
This comment has been deleted
Really easy to setup.
Should be “…select your Private Key file” I believe. Anyway, FileZilla will prompt the user if a Public Key is selected.
On Mac it is File then Preferences not Edit then Settings
I have followed this tutorial and created a private key with PuttyGen, placing the public key on the server. I am always still asked for the password for various activity in FileZilla. It was until I turned password authentication off that I realized the SSH pairing must not even be working, because now I am getting denied when typing a password in. I was assuming that the behavior would be that I never need to type a password in at all.
I hope this does not sound silly - I would like to know how to backup my whole droplet using filezilla. I want to save the whole droplet onto my pc’s desktop. When I connect to Filezilla, I see tons of folders in my droplet. When I minimise all the folders, the main folder I get is called “/”. The sub folders are “bin”, “boot”, “dev”, “etc”, “home”… “root”… “var/www”… etc… My problem is from which folder should I back up from? Do i back up from the main (largest) folder, i.e. the “/” folder?
If I back up from “/” folder, will it also include all the necessary wordpress files needed to restore wordpress? (I want to avoid using wordpress back up plugins if possible as I think it maybe a repetition).
Hope it doesn’t sound too confusing, as I’m really confused. thank you!
@hopefloatt: Backing up every single file is inefficient and slow (and will error out when it reaches /dev and /proc). You will most likely need to backup /var/www and your MySQL data.
Check out <a href=“https://www.digitalocean.com/community/articles/how-to-choose-an-effective-backup-strategy-for-your-vps”>https://www.digitalocean.com/community/articles/how-to-choose-an-effective-backup-strategy-for-your-vps</a> & <a href=“https://www.digitalocean.com/community/articles/how-to-backup-mysql-databases-on-an-ubuntu-vps”>https://www.digitalocean.com/community/articles/how-to-backup-mysql-databases-on-an-ubuntu-vps</a>.
Hello,
I followed this tutorial and I manage to connect to the server via SFTP but I get permission denied when I tried to reach “var/www/html” and change some files. Can anyone please help me with that?
Thanks
@Gürcan: What user are you connecting as and does it have permission to write to /var/www/html?
Is there way to download or copy the contents of wetransfer links directly to the VPS? If yes, how?