Tutorial
5 Genetic Algorithm Applications Using PyGAD

This tutorial introduces PyGAD, an open-source Python library for implementing the genetic algorithm and training machine learning algorithms. PyGAD supports 19 parameters for customizing the genetic algorithm for various applications.
Within this tutorial, we’ll discuss five different applications of the genetic algorithm and build them using PyGAD.
The outline of the tutorial is as follows:
- PyGAD Installation
- Getting Started with PyGAD
- Fitting a Linear Model
- Reproducing Images
- 8 Queen Puzzle
- Training Neural Networks
- Training Convolutional Neural Networks
Prerequisites
- Python: Basic understanding of Python programming.
- Deep Learning: Familiarity with neural networks, particularly CNNs and object detection.
PyGAD Installation
PyGAD can be easily installed using pip from PyPI (Python Package Index) on Windows. Use the following command:
pip install pygad
For Mac/Linux, use pip3 instead of pip in the terminal command:
pip3 install pygad
Then, make sure the library is installed by importing it from the Python shell:
import pygad
The latest PyGAD version is currently 2.3.2, which was released on June 1st, 2020. The current version can be returned using the __version__ special variable.
import pygad

print(pygad.__version__)
Now that PyGAD is installed, here’s a brief overview.
Getting Started with PyGAD
The main goal of PyGAD is to provide a simple implementation of the genetic algorithm. It offers a range of parameters allowing the user to customize the genetic algorithm for various applications. This tutorial discusses five such applications.
The full documentation of PyGAD is available at Read the Docs. Here, we’ll cover a more digestible breakdown of the library.
In PyGAD 2.3.2, there are five modules:
pygad: Core module for building and running genetic algorithms in Python.pygad.nn: Provides basic neural network utilities compatible with genetic algorithm evolution.pygad.gann: Enables evolving artificial neural networks using genetic algorithms.pygad.cnn: Offers tools for creating convolutional neural networks within the PyGAD framework.pygad.gacnn: Supports evolving convolutional neural networks using genetic algorithms.
Each module has its repository on GitHub, which is linked below.
The main module of the library is named pygad. This module has a single class named GA. Just create an instance of the pygad.GA class to use the genetic algorithm.
The steps to use the pygad module are:
- Create the fitness function.
- Prepare the necessary parameters for the pygad.GA class.
- Create an instance of the pygad.GA class.
- Run the genetic algorithm.
In PyGAD 2.3.2, the constructor of the pygad.GA class has 19 parameters, of which 16 are optional. The three required parameters are:
- num_generations: Number of generations.
- num_parents_mating: Number of solutions to be selected as parents.
- fitness_func: The fitness function that calculates the fitness value for the solutions.
The fitness_func parameter is what allows the genetic algorithm to be customized for different problems. This parameter accepts a user-defined function that calculates the fitness value for a single solution. This takes two additional parameters: the solution, and its index within the population.
Let’s see an example to make this clearer. Assume there is a population with 3 solutions, as given below.
[221, 342, 213]
[675, 32, 242]
[452, 23, -212]
The assigned function to the fitness_func parameter must return a single number representing the fitness of each solution. Here is an example that returns the sum of the solution.
def fitness_function(solution, solution_idx):
    return sum(solution)
The fitness values for the 3 solutions are then:
- 776
- 949
- 263
The parents are selected based on such fitness values. The higher the fitness value, the better the solution.
You can find the complete list of parameters for the pygad.GA class constructor on the official PyGAD documentation page.
After creating an instance of the pygad.GA class, the next step is to call the run() method, which goes through the generations that evolve the solutions.
import pygad
ga_instance = pygad.GA(...)
ga_instance.run()
These are the essential steps for using PyGAD. Of course, there are additional steps that can be taken, but this is the minimum needed.
The next sections discuss using PyGAD for several different use cases.
Fitting a Linear Model
Consider an equation with six inputs, one output, and six parameters.
y = f(w1:w6) = w1x1 + w2x2 + w3x3 + w4x4 + w5x5 + 6wx6
Let’s assume the inputs are (4,-2,3.5,5,-11,-4.7) and the output is 44. What are the values for the six parameters to satisfy the equation? The genetic algorithm can be used to find the answer.
The first thing to do is to prepare the fitness function as given below. It calculates the sum of products between each input and its corresponding parameter. The absolute difference between the desired output and the sum of products is calculated. Because the fitness function must be a maximization function, the returned fitness is equal to 1.0/difference. The solutions with the highest fitness values are selected as parents.
function_inputs = [4,-2,3.5,5,-11,-4.7]  # Function inputs.
desired_output = 44  # Function output.

def fitness_func(solution, solution_idx):
    output = numpy.sum(solution*function_inputs)
    fitness = 1.0 / numpy.abs(output - desired_output)
    return fitness
Now that we’ve prepared the fitness function, here’s a list of other important parameters.
sol_per_pop = 50
num_genes = len(function_inputs)

init_range_low = -2
init_range_high = 5

mutation_percent_genes = 1
You should also define the mandatory parameters based on your specific use case. Once these essential parameters are set, you can instantiate the pygad.GA class. For detailed information about each parameter, refer to the PyGAD GA class documentation, which provides a comprehensive overview of all available arguments and their usage.
ga_instance = pygad.GA(num_generations=num_generations,
                       num_parents_mating=num_parents_mating,
                       fitness_func=fitness_func,
                       sol_per_pop=sol_per_pop,
                       num_genes=num_genes,
                       init_range_low=init_range_low,
                       init_range_high=init_range_high,
                       mutation_percent_genes=mutation_percent_genes)
The next step is to call the run() method, which starts the generations.
ga_instance.run()
After the run() method is complete, the plot_result() method can be used to show the fitness values over the generations.
ga_instance.plot_result()
Using the best_solution() method, we can retrieve the best solution, its fitness, and its index within the population.
solution, solution_fitness, solution_idx = ga_instance.best_solution()
print("Parameters of the best solution : {solution}".format(solution=solution))
print("Fitness value of the best solution = {solution_fitness}".format(solution_fitness=solution_fitness))
print("Index of the best solution : {solution_idx}".format(solution_idx=solution_idx))
Reproducing Images
In this application, we’ll start from a random image (random pixel values), then evolve the value of each pixel using the genetic algorithm.
The tricky part of this application is that an image can be 2D or 3D, but the genetic algorithm expects the solutions to be 1D vectors. To tackle this issue, we’ll use the img2chromosome() function defined below to convert an image to a 1D vector.
def img2chromosome(img_arr):

    return numpy.reshape(a=img_arr, newshape=(functools.reduce(operator.mul, img_arr.shape)))
The chromosome2img() function (below) can then be used to restore the 2D or 3D image from the vector.
def chromosome2img(vector, shape):
    # Check if the vector can be reshaped according to the specified shape.
    if len(vector) != functools.reduce(operator.mul, shape):
        raise ValueError("A vector of length {vector_length} into an array of shape {shape}.".format(vector_length=len(vector), shape=shape))

    return numpy.reshape(a=vector, newshape=shape)
Besides the regular steps for using PyGAD, we’ll need one additional step to read the image.
import imageio
import numpy

target_im = imageio.imread('fruit.jpg')
target_im = numpy.asarray(target_im/255, dtype=numpy.float)
The sample image can be downloaded from the GitHub link.
The fitness function is then defined. This function will compute the difference between the solution’s pixels and those of the target image. The difference is subtracted from the total sum of all pixels in the target image to transform it into a maximization function.
target_chromosome = gari.img2chromosome(target_im)

def fitness_fun(solution, solution_idx):
    fitness = numpy.sum(numpy.abs(target_chromosome-solution))

    # Negating the fitness value to make it increasing rather than decreasing.
    fitness = numpy.sum(target_chromosome) - fitness
    return fitness
The next step is to create an instance of the pygad.GA class, as shown below. It is critical to the success of the application to use appropriate parameters. If the range of pixel values in the target image is 0 to 255, then the init_range_low and init_range_high must be set to 0 and 255, respectively. The reason is to initialize the population with images of the same data type as the target image. If the image pixel values range from 0 to 1, the two parameters must be set to 0 and 1, respectively.
import pygad

ga_instance = pygad.GA(num_generations=20000,
                       num_parents_mating=10,
                       fitness_func=fitness_fun,
                       sol_per_pop=20,
                       num_genes=target_im.size,
                       init_range_low=0.0,
                       init_range_high=1.0,
                       mutation_percent_genes=0.01,
                       mutation_type="random",
                       mutation_by_replacement=True,
                       random_mutation_min_val=0.0,
                       random_mutation_max_val=1.0)
When the mutation_type argument is set to random, the default behavior is to add a random value to each gene selected for mutation. This random value is selected from the range specified by the random_mutation_min_val and random_mutation_max_val parameters.
Assume the range of pixel values is 0 to 1. If a pixel has the value 0.9 and a random value of 0.3 is generated, then the new pixel value is 1.2. The new pixel value is invalid because the pixel values must fall within the 0 to 1 range. To work around this issue, setting the mutation_by_replacement parameter to `True` is very important. This causes the random value to replace the current pixel rather than being added to the pixel.
After the parameters are prepared, the genetic algorithm can run.
ga_instance.run()
The plot_result() method can show how the fitness value evolves by generation.
ga_instance.plot_result()

Once the generations are complete, information regarding the best solution can be provided.
solution, solution_fitness, solution_idx = ga_instance.best_solution()
print("Fitness value of the best solution = {solution_fitness}".format(solution_fitness=solution_fitness))
print("Index of the best solution : {solution_idx}".format(solution_idx=solution_idx))
The best solution can be converted into an image to be displayed.
import matplotlib.pyplot

result = gari.chromosome2img(solution, target_im.shape)
matplotlib.pyplot.imshow(result)
matplotlib.pyplot.show()
Here is the result.

8 Queen Puzzle
The 8 queens puzzle involves 8 chess queens distributed across an 8×8 matrix, with one queen per row. The goal is to place these queens so that no queen can attack another one vertically, horizontally, or diagonally. The genetic algorithm can find a solution that satisfies such conditions.
This project is available on GitHub. Its GUI, built using Kivy, shows an 8×8 matrix, as shown in the next figure.
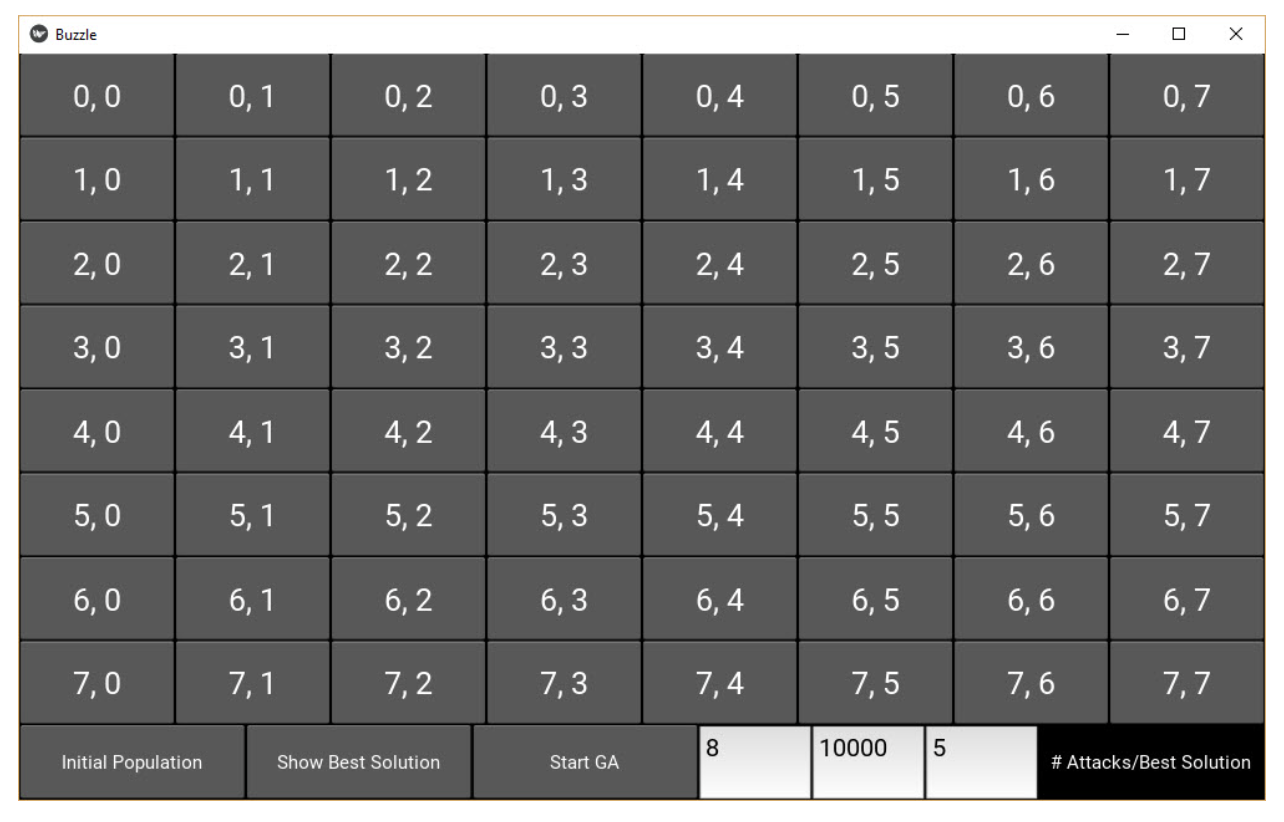
The GUI has three buttons at the bottom of the screen. The function of these buttons is as follows:
- The Initial Population button creates the initial population of the GA.
- The “Show Best Solution” button displays the top solution from the last generation where the GA halted.
- The Start GA button starts the GA iterations/generations.
To use this project, begin by pressing the “Initial Population” and “Start GA” buttons. Below is the method called by the “Initial Population” button, which generates the initial population.
def initialize_population(self, *args):
    self.num_solutions = 10

    self.reset_board_text()

    self.population_1D_vector = numpy.zeros(shape=(self.num_solutions, 8))

    for solution_idx in range(self.num_solutions):
        initial_queens_y_indices = numpy.random.rand(8)*8
        initial_queens_y_indices = initial_queens_y_indices.astype(numpy.uint8)
        self.population_1D_vector[solution_idx, :] = initial_queens_y_indices

    self.vector_to_matrix()

    self.pop_created = 1
    self.num_attacks_Label.text = "Initial Population Created."
Each solution in the population is a vector with 8 elements referring to the column indices of the 8 queens. The 1D vector is converted into a 2D matrix using the vector_to_matrix() method to show the queens’ locations on the screen.
The next figure shows “Queen” on the screen.

Now that the GUI is built, we’ll build and run the genetic algorithm using PyGAD.
The fitness function used in this project is given below. It calculates the number of attacks each of the 8 queens can make and returns this as the fitness value.
def fitness(solution_vector, solution_idx):

    if solution_vector.ndim == 2:
        solution = solution_vector
    else:
        solution = numpy.zeros(shape=(8, 8))

        row_idx = 0
        for col_idx in solution_vector:
            solution[row_idx, int(col_idx)] = 1
            row_idx = row_idx + 1

    total_num_attacks_column = attacks_column(solution)

    total_num_attacks_diagonal = attacks_diagonal(solution)

    total_num_attacks = total_num_attacks_column + total_num_attacks_diagonal

    if total_num_attacks == 0:
        total_num_attacks = 1.1 # float("inf")
    else:
        total_num_attacks = 1.0/total_num_attacks

    return total_num_attacks
Pressing the Start GA button creates an instance of the pyramid.GA class, and the run() method is called.
ga_instance = pygad.GA(num_generations=500,
                       num_parents_mating=5,
                       fitness_func=fitness,
                       num_genes=8,
                       initial_population=self.population_1D_vector,
                       mutation_percent_genes=0.01,
                       mutation_type="random",
                       mutation_num_genes=3,
                       mutation_by_replacement=True,
                       random_mutation_min_val=0.0,
                       random_mutation_max_val=8.0,
                       callback_generation=callback)

ga_instance.run()
Here is a possible solution: the 8 queens are placed on the board so no queen attacks another.

The complete code for this project can be found on GitHub.
Training Neural Networks
Among other machine learning algorithms, the genetic algorithm can train neural networks. PyGAD supports training neural networks, particularly convolutional neural networks, using the pyramid.gann.GANN and pygad.gacnn.GACNN modules. This section discusses how to use the pyramid.gann.GANN module to train neural networks for a classification problem.
Before building the genetic algorithm, the training data is prepared. This example builds a network that simulates the XOR logic gate.
# Preparing the NumPy array of the inputs.
data_inputs = numpy.array([[1, 1],
                           [1, 0],
                           [0, 1],
                           [0, 0]])

# Preparing the NumPy array of the outputs.
data_outputs = numpy.array([0,
                            1,
                            1,
                            0])
The next step is to create an instance of the pyramid.gann.GANN class. This class builds a population of neural networks with the same architecture.
num_inputs = data_inputs.shape[1]
num_classes = 2

num_solutions = 6
GANN_instance = pygad.gann.GANN(num_solutions=num_solutions,
                                num_neurons_input=num_inputs,
                                num_neurons_hidden_layers=[2],
                                num_neurons_output=num_classes,
                                hidden_activations=["relu"],
                                output_activation="softmax")
After creating the instance of the pygad.gann.GANN class, the next step is to create the fitness function. This returns the classification accuracy for the passed solution.
import pygad.nn
import pygad.gann

def fitness_func(solution, sol_idx):
    global GANN_instance, data_inputs, data_outputs

    predictions = pygad.nn.predict(last_layer=GANN_instance.population_networks[sol_idx],
                                   data_inputs=data_inputs)
    correct_predictions = numpy.where(predictions == data_outputs)[0].size
    solution_fitness = (correct_predictions/data_outputs.size)*100

    return solution_fitness
Besides the fitness function, the other necessary parameters are prepared, which we discussed previously.
population_vectors = pygad.gann.population_as_vectors(population_networks=GANN_instance.population_networks)

initial_population = population_vectors.copy()

num_parents_mating = 4

num_generations = 500

mutation_percent_genes = 5

parent_selection_type = "sss"

crossover_type = "single_point"

mutation_type = "random"

keep_parents = 1

init_range_low = -2
init_range_high = 5
Once all parameters are set up, an instance of the `pygad.GA` class is created.
ga_instance = pygad.GA(num_generations=num_generations,
                       num_parents_mating=num_parents_mating,
                       initial_population=initial_population,
                       fitness_func=fitness_func,
                       mutation_percent_genes=mutation_percent_genes,
                       init_range_low=init_range_low,
                       init_range_high=init_range_high,
                       parent_selection_type=parent_selection_type,
                       crossover_type=crossover_type,
                       mutation_type=mutation_type,
                       keep_parents=keep_parents,
                       callback_generation=callback_generation)
The callback_generation parameter refers to a function that is called after each generation. In this application, this function updates the weights of all the neural networks after each generation.
def callback_generation(ga_instance):
    global GANN_instance

    population_matrices = pygad.gann.population_as_matrices(population_networks=GANN_instance.population_networks, population_vectors=ga_instance.population)
    GANN_instance.update_population_trained_weights(population_trained_weights=population_matrices)
The next step is to call the run() method.
ga_instance.run()
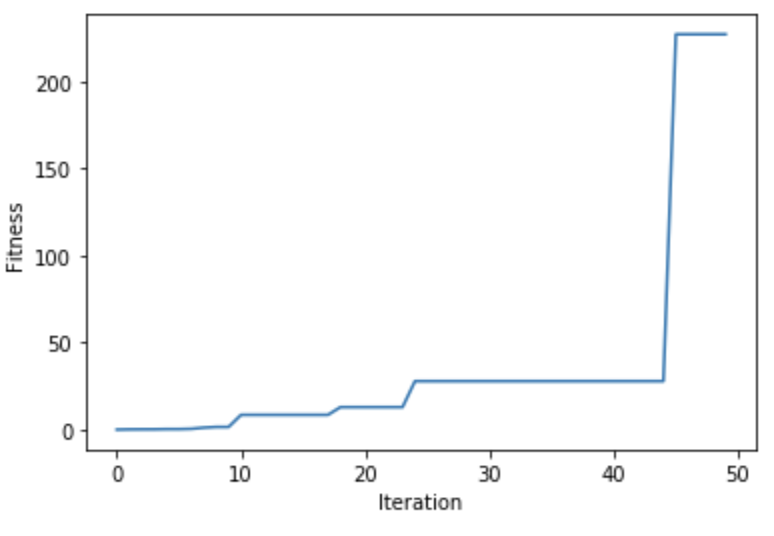
After the run() method is complete, the next figure shows how the fitness value evolved. The figure shows that a classification accuracy of 100% is reached.

Training Convolutional Neural Networks
Like training multilayer perceptrons, PyGAD supports training convolutional neural networks using the genetic algorithm.
The first step is to prepare the training data. The data can be downloaded from these links:
- dataset_inputs.npy: Data inputs.
- dataset_outputs.npy: Class labels.
import numpy

train_inputs = numpy.load("dataset_inputs.npy")
train_outputs = numpy.load("dataset_outputs.npy")
The next step is to build the CNN architecture using the pygad.cnn module.
import pygad.cnn

input_layer = pygad.cnn.Input2D(input_shape=(80, 80, 3))
conv_layer = pygad.cnn.Conv2D(num_filters=2,
                              kernel_size=3,
                              previous_layer=input_layer,
                              activation_function="relu")
average_pooling_layer = pygad.cnn.AveragePooling2D(pool_size=5,
                                                   previous_layer=conv_layer,
                                                   stride=3)

flatten_layer = pygad.cnn.Flatten(previous_layer=average_pooling_layer)
dense_layer = pygad.cnn.Dense(num_neurons=4,
                              previous_layer=flatten_layer,
                              activation_function="softmax")
After the layers in the network are stacked, a model is created.
model = pygad.cnn.Model(last_layer=dense_layer,
                        epochs=5,
                        learning_rate=0.01)
Using the summary() method, a summary of the model architecture is returned.
----------Network Architecture----------
<class 'cnn.Conv2D'>
<class 'cnn.AveragePooling2D'>
<class 'cnn.Flatten'>
<class 'cnn.Dense'>
----------------------------------------
After the model is prepared, the pygad.gacnn.GACNN class is instantiated to create the initial population. All the networks have the same architecture.
import pygad.gacnn

GACNN_instance = pygad.gacnn.GACNN(model=model,
                                   num_solutions=4)
The next step is to prepare the fitness function. This calculates the classification accuracy for the passed solution.
def fitness_func(solution, sol_idx):
    global GACNN_instance, data_inputs, data_outputs

    predictions = GACNN_instance.population_networks[sol_idx].predict(data_inputs=data_inputs)
    correct_predictions = numpy.where(predictions == data_outputs)[0].size
    solution_fitness = (correct_predictions/data_outputs.size)*100

    return solution_fitness
The other parameters are also prepared.
population_vectors = pygad.gacnn.population_as_vectors(population_networks=GACNN_instance.population_networks)

initial_population = population_vectors.copy()

num_parents_mating = 2

num_generations = 10

mutation_percent_genes = 0.1

parent_selection_type = "sss"

crossover_type = "single_point"

mutation_type = "random"

keep_parents = -1
After all parameters are prepared, an instance of the pygad.GA class is created.
ga_instance = pygad.GA(num_generations=num_generations,
                       num_parents_mating=num_parents_mating,
                       initial_population=initial_population,
                       fitness_func=fitness_func,
                       mutation_percent_genes=mutation_percent_genes,
                       parent_selection_type=parent_selection_type,
                       crossover_type=crossover_type,
                       mutation_type=mutation_type,
                       keep_parents=keep_parents,
                       callback_generation=callback_generation)
The callback_generation parameter is used to update the network weights after each generation.
def callback_generation(ga_instance):
    global GACNN_instance, last_fitness

    population_matrices = pygad.gacnn.population_as_matrices(population_networks=GACNN_instance.population_networks, population_vectors=ga_instance.population)

    GACNN_instance.update_population_trained_weights(population_trained_weights=population_matrices)
The last step is to call the run() method.
ga_instance.run()
Conclusion
In this tutorial, we explored PyGAD, a powerful open-source Python library designed to simplify the implementation of genetic algorithms. PyGAD offers a flexible and customizable interface, making it a great choice for a wide range of optimization problems—from simple function optimization to more complex machine learning tasks.
The examples provided in this article demonstrate just how versatile and beginner-friendly PyGAD can be, especially when experimenting with evolutionary strategies in AI and optimization.
Whether you’re a researcher, developer, or hobbyist, PyGAD is a fantastic tool to add to your arsenal for solving optimization problems without needing gradient information or large datasets.
I hope you enjoyed following along! If you have any questions or want to dive deeper, feel free to leave a comment or explore the official documentation for more examples and advanced features.
Thanks for learning with the DigitalOcean Community. Check out our offerings for compute, storage, networking, and managed databases.
About the author(s)
This textbox defaults to using Markdown to format your answer.
You can type !ref in this text area to quickly search our full set of tutorials, documentation & marketplace offerings and insert the link!

Become a contributor for community
Get paid to write technical tutorials and select a tech-focused charity to receive a matching donation.

DigitalOcean Documentation
Full documentation for every DigitalOcean product.

Resources for startups and SMBs
The Wave has everything you need to know about building a business, from raising funding to marketing your product.
The developer cloud
Scale up as you grow — whether you're running one virtual machine or ten thousand.

Get started for free
Sign up and get $200 in credit for your first 60 days with DigitalOcean.*

*This promotional offer applies to new accounts only.